The only problem is the mountain of studying/homework/prep I still have to do. And my inability to get things done on time.
Ah, well. Yesterday I went grocery shopping and got lots of exotic things: beets, turnips, and cabbage (all for borscht!), fuyu persimmons (the eating kind, not the baking kind), and eggplant (4 of them, and I've already used 3 on baba ghanoush; the last I'm saving for baigan bharta). Yum......
Also, check this out:
I feel like such a popular cousin. Can you guess which option I chose?
<3
Eliza
Showing posts with label food. Show all posts
Monday, December 6, 2010
Thursday, November 11, 2010
Sanity Check... just to make sure
Am I crazy for thinking these are way cute?

What about these?

How do you feel about red boots?


Just wondering :)
<3
Eliza
P.S. Check out my new food blog, procrastinatingcollegecook.blogspot.com! I decided not to lambast you with all of my recipes on this site, so now they have a new home. Hope you enjoy it!
What about these?

How do you feel about red boots?


Just wondering :)
<3
Eliza
P.S. Check out my new food blog, procrastinatingcollegecook.blogspot.com! I decided not to lambast you with all of my recipes on this site, so now they have a new home. Hope you enjoy it!
Tuesday, November 2, 2010
I know you're still waiting for the running post, but...
So, I have been working on the running post, but as I don't have any pictures of us all in our running outfits, I couldn't really finish it off. Don't worry; it's coming! I also have a Halloween post in the works. I'll get to it. In the meantime, I made something so easy, so divine, so wonderful tonight, that I had to share it:
I first read this recipe about three weeks ago, and I've been dreaming about it ever since. Two weeks ago, the grocery store was having a sale on all kinds of pears - Bosc, D'Anjou, Bartlett - so I picked up a couple of each, in anticipation of the recipe, which I hadn't read thoroughly enough to know that it called for 3-4 Bosc pears. By the time I finally got to actually cooking the recipe this evening, there were only four pears still edible: two Bartletts, a Bosc, and a D'Anjou. So I ran with it. It was delicious.
First, you caramelize some honey in a pan. Add pears and cook. Then you roast them in the oven, pour batter over the top, sprinkle some sliced almonds on top of that, and bake.
Wait as long as you can after it comes out of the oven (I didn't wait long enough, and my cake had a large hole in the middle), and flip upside down on a plate. Eat. So easy, and so sinfully delectable.
I had Heidi over to help eat the cake, along with Stacey and Kristin. We saved about 1/5 of the cake for Megan, who was at work, but we devoured the rest of it. The recipe is supposed to yield 6-8 servings; we got 5.
Recipe (originally from here, and many of the instructions are quoted word-for-word):
Honey-Glazed Pear Upside-Down Cake
My modifications are mostly marked with asterisks, with references down at the bottom, so I wouldn't clog up the recipe itself!
1/4 c. honey*
4 small or 3 large Bosc pears, peeled,* quartered lengthwise, and cored
3 sprigs fresh thyme (optional)*
1 cup sugar
Finely grated zest of one lemon (not optional!)
2 large eggs
1 tablespoon vanilla extract
1 c. flour (would half whole-wheat give this more depth? I don't know... maybe I'll try next time)
1/4 t salt
6 Tablespoons butter, melted and cooled, plus 1 tablespoon melted and cooled separately*
1/4 c. sliced almonds (buy these at the store, don't try to slice them yourself. The structure helps hold the cake crust together)
1. Preheat oven to 350. In a 9-inch skillet,* simmer honey until it begins to reduce, caramelize, and darken, 6-10 minutes. Do not let honey burn; if it starts to smell burned, turn off heat.
My changes to the recipe:
1. The recipe calls for chestnut honey. I used regular clover honey. It was still good.
2. I didn't peel the pears. Mostly because I was so eager to bake the cake that I didn't read the instructions very well. but still... yummy. And also it adds more fiber, even if it's not as pretty.
3. I didn't have fresh thyme, so I sprinkled a tiny bit of ground thyme on top of the pears before I put them in the oven. It was good, and added another flavor dimension. I think if I have the chance, though, I'll try it with fresh thyme sprigs.
4. The recipe called for 1/2 cup plus 1 T, but I didn't feel like I needed quite so much. I used maybe 6 tablespoons plus the tablespoon to melt over the pears.
5. The recipe says not to use a non-stick skillet, as they apparently don't go in the oven (?). I just cooked my pears over the stovetop in a non-stick skillet and then dumped them into a 9-inch cake pan for the roasting. The recipe reflects my changes :)
6. It won't seem like there's enough batter, but just pour/spread/spoon it evenly over, and it will turn out.
Enjoy!
<3
Eliza
Honey-Glazed Pear Upside-Down Cake
If that name doesn't appeal to you, I don't know what will. And also, I'm not sure we can be friends anymore. (Sorry the picture's blurry; it smelled so delightful I had a hard time holding myself back to take pictures while I could have been eating it!)
I first read this recipe about three weeks ago, and I've been dreaming about it ever since. Two weeks ago, the grocery store was having a sale on all kinds of pears - Bosc, D'Anjou, Bartlett - so I picked up a couple of each, in anticipation of the recipe, which I hadn't read thoroughly enough to know that it called for 3-4 Bosc pears. By the time I finally got to actually cooking the recipe this evening, there were only four pears still edible: two Bartletts, a Bosc, and a D'Anjou. So I ran with it. It was delicious.
First, you caramelize some honey in a pan. Add pears and cook. Then you roast them in the oven, pour batter over the top, sprinkle some sliced almonds on top of that, and bake.
Upside down, just out of the oven. It smelled sooo good I can't even tell you. Pears + honey + vanilla + lemon + almond?? Duh it smelled delicious.
Wait as long as you can after it comes out of the oven (I didn't wait long enough, and my cake had a large hole in the middle), and flip upside down on a plate. Eat. So easy, and so sinfully delectable.
The big hole in the middle of my cake, quickly fixed by stuffing it with the cake that remained in the pan.
I had Heidi over to help eat the cake, along with Stacey and Kristin. We saved about 1/5 of the cake for Megan, who was at work, but we devoured the rest of it. The recipe is supposed to yield 6-8 servings; we got 5.
Recipe (originally from here, and many of the instructions are quoted word-for-word):
Honey-Glazed Pear Upside-Down Cake
My modifications are mostly marked with asterisks, with references down at the bottom, so I wouldn't clog up the recipe itself!
1/4 c. honey*
4 small or 3 large Bosc pears, peeled,* quartered lengthwise, and cored
3 sprigs fresh thyme (optional)*
1 cup sugar
Finely grated zest of one lemon (not optional!)
2 large eggs
1 tablespoon vanilla extract
1 c. flour (would half whole-wheat give this more depth? I don't know... maybe I'll try next time)
1/4 t salt
6 Tablespoons butter, melted and cooled, plus 1 tablespoon melted and cooled separately*
1/4 c. sliced almonds (buy these at the store, don't try to slice them yourself. The structure helps hold the cake crust together)
1. Preheat oven to 350. In a 9-inch skillet,* simmer honey until it begins to reduce, caramelize, and darken, 6-10 minutes. Do not let honey burn; if it starts to smell burned, turn off heat.
2. Arrange pears, close together and cut-side down, in a circular pattern in skillet, stem ends pointing toward center (I didn't bother, as my pears were all assorted and different sizes). Simmer over medium heat, turning them from one cut side to the other, until they begin to turn golden, about 10 minutes.
3. Pour pears and juices into a 9-inch cake pan. Flip pears over to their curved side and scatter with thyme sprigs (or sprinkle with ground thyme) if using. Transfer pan to oven and roast, uncovered, until very tender, about 25 minutes.
4. Meanwhile, in a large bowl, whisk together sugar and lemon zest. Whisk in eggs and vanilla. Fold in flour and salt; stir in 1/2 cup butter.
5. When pears are soft, remove pan from oven, discard thyme sprigs and brush edges of pears with remaining 1 tablespoon melted butter. Pour batter on roasted pears* and scatter almonds over batter. Bake until a toothpick inserted in center comes out clean, 25 to 30 minutes. Let cake cool for 30 minutes in pan. Run an offset spatula along edges of pan to loosen cake; carefully invert cake onto a serving platter. Serve warm or cooled.
My changes to the recipe:
1. The recipe calls for chestnut honey. I used regular clover honey. It was still good.
2. I didn't peel the pears. Mostly because I was so eager to bake the cake that I didn't read the instructions very well. but still... yummy. And also it adds more fiber, even if it's not as pretty.
3. I didn't have fresh thyme, so I sprinkled a tiny bit of ground thyme on top of the pears before I put them in the oven. It was good, and added another flavor dimension. I think if I have the chance, though, I'll try it with fresh thyme sprigs.
4. The recipe called for 1/2 cup plus 1 T, but I didn't feel like I needed quite so much. I used maybe 6 tablespoons plus the tablespoon to melt over the pears.
5. The recipe says not to use a non-stick skillet, as they apparently don't go in the oven (?). I just cooked my pears over the stovetop in a non-stick skillet and then dumped them into a 9-inch cake pan for the roasting. The recipe reflects my changes :)
6. It won't seem like there's enough batter, but just pour/spread/spoon it evenly over, and it will turn out.
Enjoy!
<3
Eliza
Thursday, October 28, 2010
Bagels
Last Saturday, I was at home during a rainy, cold day, and I didn't want to do homework. Not the most uncommon situation, but in this case I didn't have any urgent tasks, and so I decided to do something fun.
I've been planning to make this recipe for a while now, and I finally had the time. In case the post title didn't clue you in, I made bagels! Whole-wheat cranberry walnut bagels, to be exact. I started them off in the early afternoon, then went and worked on researching to vote. I let the sponge rise for two hours, then added the rest of the ingredients and kneaded. And kneaded it. And kneaded it some more. If I had a bread mixer, it wouldn't have taken so long, but it was still worth it. After about 1/2 an hour of kneading, I'd finally gotten my dough to the right texture. I shaped it into little bagel balls and let it rest. Then I shaped it into mini-bagels (variation from the recipe, yay!), and let it rest again.
I hadn't read through the directions very well, so I was a little bit surprised that I needed to put the dough in the fridge overnight. It worked, though.
On Sunday afternoon, after church, I came home and pulled a pan of bagels out of the fridge. I preheated the oven and set a pot of water on to boil. In the meantime, I mixed some nutella and cream cheese to replace the hazelnut cream cheese called for in the recipe. Yum. Then I added baking soda to the boiling water, dropped the bagels in, and turned on the timer. After a minute, I flipped them. After another minute, I dropped them back on the pan with some cornmeal underneath. I learned after the first batch that it's better to grease and cornmeal the pan, rather than using waxed/parchment paper.
I put the bagels in the oven for a few minutes less than the recommended time, because they were about 1/2 the size of those in the recipe. When I pulled them out, they were fragrant, chewy, and delicious, full of whole-grain, walnut, and cranberry goodness.
When they were warm, I didn't want to put the cream cheese mixture on them, because they were too good alone. Once they'd cooled, though, it was an amazing addition. I froze about 1/3 of them, ate or gave away half, and then left the rest out for lunches.
This project was so fun - I had a great time, even though it was kind of a long time. One funny part? The next day I had sore ab muscles from leaning over the counter and kneading.
Overall, this project was worth it - much yummier and healthier than store-bought bagels. I've also started researching other bagel recipes, although I need to use up these ones first! Have fun!
<3
Eliza
P.S. On Sunday I got together with Melissa and Natalie, from our "compassionate service committee" (aka baking committee) of last year's ward. We made pumpkin bread, pumpkin cookies, and banana bread. It was so much fun!
P.P.S. You can get vital wheat gluten at winco or whole foods in bulk, or you could just buy a box of it at the grocery store :)
I've been planning to make this recipe for a while now, and I finally had the time. In case the post title didn't clue you in, I made bagels! Whole-wheat cranberry walnut bagels, to be exact. I started them off in the early afternoon, then went and worked on researching to vote. I let the sponge rise for two hours, then added the rest of the ingredients and kneaded. And kneaded it. And kneaded it some more. If I had a bread mixer, it wouldn't have taken so long, but it was still worth it. After about 1/2 an hour of kneading, I'd finally gotten my dough to the right texture. I shaped it into little bagel balls and let it rest. Then I shaped it into mini-bagels (variation from the recipe, yay!), and let it rest again.
I hadn't read through the directions very well, so I was a little bit surprised that I needed to put the dough in the fridge overnight. It worked, though.
On Sunday afternoon, after church, I came home and pulled a pan of bagels out of the fridge. I preheated the oven and set a pot of water on to boil. In the meantime, I mixed some nutella and cream cheese to replace the hazelnut cream cheese called for in the recipe. Yum. Then I added baking soda to the boiling water, dropped the bagels in, and turned on the timer. After a minute, I flipped them. After another minute, I dropped them back on the pan with some cornmeal underneath. I learned after the first batch that it's better to grease and cornmeal the pan, rather than using waxed/parchment paper.
I put the bagels in the oven for a few minutes less than the recommended time, because they were about 1/2 the size of those in the recipe. When I pulled them out, they were fragrant, chewy, and delicious, full of whole-grain, walnut, and cranberry goodness.
When they were warm, I didn't want to put the cream cheese mixture on them, because they were too good alone. Once they'd cooled, though, it was an amazing addition. I froze about 1/3 of them, ate or gave away half, and then left the rest out for lunches.
This project was so fun - I had a great time, even though it was kind of a long time. One funny part? The next day I had sore ab muscles from leaning over the counter and kneading.
Overall, this project was worth it - much yummier and healthier than store-bought bagels. I've also started researching other bagel recipes, although I need to use up these ones first! Have fun!
<3
Eliza
P.S. On Sunday I got together with Melissa and Natalie, from our "compassionate service committee" (aka baking committee) of last year's ward. We made pumpkin bread, pumpkin cookies, and banana bread. It was so much fun!
P.P.S. You can get vital wheat gluten at winco or whole foods in bulk, or you could just buy a box of it at the grocery store :)
Monday, October 25, 2010
Food, part 2
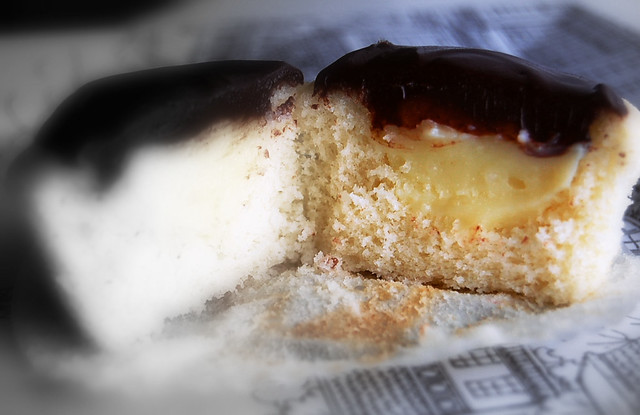
Boston Cream Pie Cupcakes

Um... yum? These were delish, and although you have to keep a pretty close eye on the stove for the custard, they were fairly quick and easy. Plus, they're very cute and they smell divine. I won't write out the recipe, but you can find it here (along with the picture above).
Butternut Squash and Cheese Pie

Picture taken, again, from the original website, here.
Ingredients:
-1 butternut squash (1.5-2 pound)
-Olive oil
-1 large onion, chopped
-2/3 cup grated cheddar cheese
-2/3 cup other cheese (I used Swiss, but you could use gruyere or muenster, if you're feeling rich and fancy)
-1/2 cup goat cheese (I skipped this, and it didn't create a problem)
-1 T fresh rosemary or 1 t dried rosemary
-2 eggs
-2 egg yolks
-2/3 cup cream
-Salt and pepper
-One 9-inch pie crust, baked (I had my frozen one from conference weekend, which I pulled out and baked beforehand!)
Directions;
1. Cut and cook butternut squash with a little bit of olive oil. I used the microwave, as usual.
2. Saute onion in olive oil until it browns. Combine onion with cheeses and rosemary in a bowl.
3. Food-process eggs, egg yolks, cream, and butternut squash (I used my immersion blender!). Combine with onion and cheeses. Add salt and pepper to taste (make sure you use a lot; it really makes a difference.)
4. Pour into baked pie crust and bake at 400 degrees for 30-40 minutes, or until center is set. Cool and eat.
Pita Bread

Um... yum? These were delish, and although you have to keep a pretty close eye on the stove for the custard, they were fairly quick and easy. Plus, they're very cute and they smell divine. I won't write out the recipe, but you can find it here (along with the picture above).
Butternut Squash and Cheese Pie
Picture taken, again, from the original website, here.
Ingredients:
-1 butternut squash (1.5-2 pound)
-Olive oil
-1 large onion, chopped
-2/3 cup grated cheddar cheese
-2/3 cup other cheese (I used Swiss, but you could use gruyere or muenster, if you're feeling rich and fancy)
-1/2 cup goat cheese (I skipped this, and it didn't create a problem)
-1 T fresh rosemary or 1 t dried rosemary
-2 eggs
-2 egg yolks
-2/3 cup cream
-Salt and pepper
-One 9-inch pie crust, baked (I had my frozen one from conference weekend, which I pulled out and baked beforehand!)
Directions;
1. Cut and cook butternut squash with a little bit of olive oil. I used the microwave, as usual.
2. Saute onion in olive oil until it browns. Combine onion with cheeses and rosemary in a bowl.
3. Food-process eggs, egg yolks, cream, and butternut squash (I used my immersion blender!). Combine with onion and cheeses. Add salt and pepper to taste (make sure you use a lot; it really makes a difference.)
4. Pour into baked pie crust and bake at 400 degrees for 30-40 minutes, or until center is set. Cool and eat.
Pita Bread
This pita bread was quite easy, surprisingly. I put the dough together in the morning, stuck it in the refrigerator, and then pulled it out and baked it that evening. It puffed up perfectly, and went perfectly with the next recipe... Oh, and I used half whole-wheat flour to make it healthier. Yay!
Ground Beef (or Turkey) Gyros
SO easy.
And delicious. From here. Although the pictures are actually from my camera, for once.
Ingredients:
-8 oz. plain yogurt
-1/3 cup chopped seeded cucumber
-2 T finely chopped onions
-1 garlic clove, minced
-1 t sugar
-1 lb. lean ground beef or ground turkey (you can find this frozen for about $1.50!)
-1 1/2 t oregano
-1 t garlic powder
-1 t onion powder
-1 t salt
-3/4 t pepper
-4 pita breads (use the ones from the recipe above, or buy already-made ones)
-Lettuce, Tomatoes, and sliced onions (red?) for topping
Instructions:
1. In a bowl, combine first five ingredients. Cover and refrigerate.
2. In a separate bowl, combine meat and seasonings. Mix well and shape into 4 patties.
3. Cook for 10-12 minutes, turning once. I used a frying pan on the stove, but you could also broil or grill them.
4. Cut patties into thin slices. Stuff into pitas with lettuce, tomatoes, onions, and yogurt sauce.
These gyros are awesomely amazing. They even have Houghton family approval behind them. Whoo!
Good luck cooking!
<3
Eliza
Sunday, October 24, 2010
Food, part 1
Things I've made:
Indian-Spiced Popcorn (fabulously yellow, no?)
Roasted Carrots
-I love boiled carrots, fresh carrots, and steamed carrots. But this is probably my favorite preparation so far. It's awesome, and you could alter it as desired to give the carrots a different character.
Recipe:
1. Toss some chopped (diagonally, about 1.5-inch long) carrots with olive oil, salt, and plenty of pepper.
2. Put on a baking sheet in a single layer.
3. Bake at 400 degrees for about 20 minutes, or until soft and slightly caramelized.
4. Sprinkle with parsley, dill, or any other spice you think would taste good.
5. Devour.
For more detailed instructions, see this recipe.
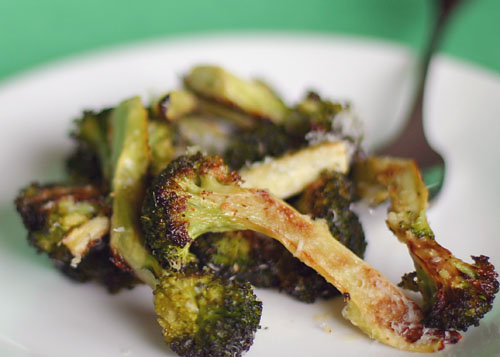
Roasted Broccoli

This is a picture from the site where I got the original recipe (see this for more detailed instructions/measurements), but it looks quite similar to what I ended up with. I used the leftover broccoli from the veggie tray at my party (thanks, Stacey!). I literally could not stop eating it. Yummy.
Recipe:
1. Preheat the oven to 425. Cut broccoli into stalks like those shown above.
2. In a small saucepan, heat some olive oil (regular vegetable would probably be fine too, but I didn't want to risk it) and minced garlic on low heat for about five minutes, or until garlic starts to turn golden.
3. Add a pinch of crushed red pepper to the oil/garlic mix and cook for one minute more. Remove from heat.
4. In a large bowl, combine broccoli and oil. Add some lemon juice, salt, and pepper. Toss to coat broccoli with a thin layer of oil. I realized that I didn't have quite enough oil, so I sprayed some Pam on it.
5 Spread broccoli in a single layer on a pan and place in oven. After 10 minutes, it should be slightly caramelized (read: browned) on the bottom. Remove.
6. Sprinkle with parmesan cheese (I used the bottled kind, but fresh would be delicious too).
7. EAT!
I have tons more recipes, but I don't really want to put them all on one post. So I will put more of my favorites from the last few weeks up soon! Love you all lots.
<3
Eliza
P.S. Grandma: it worked! I can see your comment, as long as you post it while you're in gmail. It's great to hear from you, and thanks again for sending my winter stuff up!
Indian-Spiced Popcorn (fabulously yellow, no?)
This popcorn is savory, unlike most popcorn. It is spicy and delicious, and I've had it (a half-batch) for dinner twice in the past few weeks.
Recipe:
Pop 1/2 cup of popcorn, however you like (I just cooked it in a pot on the stove)
Melt 1/4 cup of butter with 1t garam masala, 1/4 t turmeric, and 1/4 t cayenne pepper
Drizzle spicy butter over popcorn and add salt as needed (as you pour the butter over it, so it will stick to the popcorn)
Sidenote: Mom, you can buy garam masala in bulk at Whole Foods. Trust me, it's worth it. Also, could you please buy some and send me a few teaspoons? That would make me very happy :)Roasted Carrots
-I love boiled carrots, fresh carrots, and steamed carrots. But this is probably my favorite preparation so far. It's awesome, and you could alter it as desired to give the carrots a different character.
Recipe:
1. Toss some chopped (diagonally, about 1.5-inch long) carrots with olive oil, salt, and plenty of pepper.
2. Put on a baking sheet in a single layer.
3. Bake at 400 degrees for about 20 minutes, or until soft and slightly caramelized.
4. Sprinkle with parsley, dill, or any other spice you think would taste good.
5. Devour.
For more detailed instructions, see this recipe.
Roasted Broccoli

This is a picture from the site where I got the original recipe (see this for more detailed instructions/measurements), but it looks quite similar to what I ended up with. I used the leftover broccoli from the veggie tray at my party (thanks, Stacey!). I literally could not stop eating it. Yummy.
Recipe:
1. Preheat the oven to 425. Cut broccoli into stalks like those shown above.
2. In a small saucepan, heat some olive oil (regular vegetable would probably be fine too, but I didn't want to risk it) and minced garlic on low heat for about five minutes, or until garlic starts to turn golden.
3. Add a pinch of crushed red pepper to the oil/garlic mix and cook for one minute more. Remove from heat.
4. In a large bowl, combine broccoli and oil. Add some lemon juice, salt, and pepper. Toss to coat broccoli with a thin layer of oil. I realized that I didn't have quite enough oil, so I sprayed some Pam on it.
5 Spread broccoli in a single layer on a pan and place in oven. After 10 minutes, it should be slightly caramelized (read: browned) on the bottom. Remove.
6. Sprinkle with parmesan cheese (I used the bottled kind, but fresh would be delicious too).
7. EAT!
I have tons more recipes, but I don't really want to put them all on one post. So I will put more of my favorites from the last few weeks up soon! Love you all lots.
<3
Eliza
P.S. Grandma: it worked! I can see your comment, as long as you post it while you're in gmail. It's great to hear from you, and thanks again for sending my winter stuff up!
Tuesday, October 5, 2010
Mmmm...
A quick foreword: on Conference weekends, I like to cook. A lot. So this is a collection of all the things I cooked this weekend, after my uber-successful trip to Winco. I forgot to get a picture of it, but in addition to all this stuff, I made kugen (yum!) on Sunday morning. All of my roommates were gone except for Kristin, so I ate most of it by myself. I have no regrets.
Not pictured: Tapioca pudding, Saturday morning.
Pectin. Not liquid pectin like it was supposed to be, but I made do.
This was the jalapeno I chopped up to put in my pepper cheddar biscuits. They're frozen unbaked in the freezer for the next time I have chili :)
Jalapeno jelly!! I made four jars of that size. Three are frozen. This jelly is delicious. I eat it on crackers daily, and if I ever start eating meat again I will put it on that, too.
Batter for buttermilk pie (see below...:)
My pie crust-making station. I made two pie crusts and froze one.
Then I decided that since I already had the floury tabletop I would make some cheddar-pepper biscuits and a galette dough to freeze too. I am such a Mormon.
I read about chocolate-dipped mangoes with curry powder on them. So of course I made some. Pretty delicious. I enjoyed trying them.
Some of my peppers from the farmer's market. These are the ones left over after my jelly-making jamboree. I think I'll make some more jelly with them (red jelly!), but I'm contemplating freezing them until some of my little jars are clean so I have some place to put it all...
The fruit section of my pantry collection. As you can see, autumn is slowly sneaking in, but summer is still hanging on!
This is a little blurry, but I'm super-excited to have my own turmeric. I'm pretty sure that's the sign of really being an adult.
Yummy yummy black bean soup. You can find the recipe here, and make sure you add a few splashes of hot sauce!
My buttermilk pie. Isn't it scrumptious? I made it on Saturday, and was going to have people over on Sunday to eat it. Long story short, I didn't.
Instead, I had it for dinner on Monday. With boysenberry syrup, no less! It was delish.
As you can tell,
I liked it a bit. I also had it for dinner tonight :P
<3
Eliza
Thursday, September 30, 2010
I have the best doctor ever and other exciting stories
Strangely enough, this was one of the pictures that came up when I searched google images for "best doctor ever."
Stories of the day:
1. My new doctor at the Student Health Center, Dr. Fors, is amazing. Today she sent me an email about my blood test results, telling me the results and explaining them. She told me that I needed to work on one (my A1C, which was 7.0). She also CALLED me, asking if I'd gotten the email and telling me to call her back if I needed anything. How awesome is that? My doctor last year got mad at me for not scheduling two appointments in a row to give him enough time, and then gave me the nurse manager's card to call if I wanted to know my lab results. What a difference.
2. I would like to brag for a minute. I got the 2nd-highest score on my physiology test. Out of two classes. I feel pretty awesome. What am I doing in the political science department? Anyways... I also did fairly well on the scantron portion of my OB test, which was exciting. However, I'm not sure about the written portion. We'll see.
3. I am becoming way more popular as the first exam approaches in Intro to International Relations. I'm getting emails all the time from anxious students. And then tearful thank-yous for reassuring them they'll do fine. It's pretty cool to be able to help them out!
4. I went to the farmer's market again today and got cherry tomatoes and the ingredients for jalapeno jelly. Probably my favorite part, though, was the huge number of samples available. I got half a peach, honey butter, raspberry jam, jalapeno jelly (2 samples because I love it!), and half of a turkey burger with apple-dried cherry chutney, because dining services sends a chef over to demonstrate cooking (but he mostly just gives out samples :) Kristin went with me and it was awesome. We've really bonded this week, especially since we've had a common enemy (the flu!).
5. The flu. We (Kristin and I) have determined that if we haven't got it by tomorrow morning, we're home free. However, we both think that we aren't going to get it, because we cleaned so much and because if we were going to get it, we should have gotten it already!
6. Dinner tonight: grilled cheese sandwich with muenster cheese, caramelized sweet onions, corn, tomatoes, cooked red pepper (in the microwave, is that even allowed?!), and a final layer of pepper cheddar. YUM. I was going to take a picture, but I couldn't find my camera and I wasn't about to let it get cold while I looked for a camera. So you'll just have to dream about it... :)
I love you all tons! Talk to you later.
<3
Eliza
P.S. do this: go to physics.byu.edu. Then press your keys in this order: up, up, down, down, left, right, left, right, b, a. This cracked me up.
Subscribe to:
Posts (Atom)